8.27.2012

Fall Centerpiece with DIY Instructions

Well, when I saw this on pinterest, I thought "well, that's what I want on my table for fall!".  But going back to the fact that we hardly have an abundance of good thrift or antique stores around here, my chances of finding a box like this were slim.  So I decided it had to be made.  After sketching up a quick plan, the honey and I cut the boards, stained, and added handles.  That was it, and I am loving how it still came out looking old.  Just what I was hoping for. 
 
Here's a quick run-through of how to build your own!
 
Our dimensions were (each board is 1x3 unless otherwise noted):
 
2 (4 total) side boards at 24" long each
2 (4 total) end pieces at 5" long each
2 bottom pieces at 22 3/4" long
4 square pieces of corner wood at 2 1/4" long (ours was a 3/4" square..something we had that we just cut down to size)..this will be used on the inside to nail the boards to if you want it a little sturdier than if just using wood glue.
 
After cutting all of our pieces and sanding the "new" out of them..making them look old and a little rounded, we stained them with Rust-oleum Wood Stain in Dark Walnut.  Then, once dry, we glued the two bottom slats together, no nail needed here.  Then we added the first side plank with a little glue, then nailed a few finishing nails down the length of the plank into the bottom piece.  Then we put the first end piece on the same way, fitting them in between the two side boards and nailing through the side pieces into the end pieces at the top and bottom of each piece.  This finishes making the first level of the box.  After that is when we added the little corner pieces in each of the four corners, for a little extra stability and somewhere to nail the second row of boads into to help the wood glue dry (the corner pieces will not come all the way up..I wanted to be able to hide them).  Then add the second row of planks the same way as the first.  Let it all dry, and add your choice of handles!  The handles we used are from Lowe's, found here
 
Here are some basic pictures so you can see the construction of the box.


The little corner pieces.
 
 
And a few different shots/angles to show you the wamth of it with the candles, and stuffed with an acorn/berry garland and grapevine balls.


As for the table runner, it's just a piece of burlap.  I washed it, ironed it, and cut a rectangle piece to coordinate with the weird dimensions of our table.  Then I just pulled out about 7 strings on each side to give it the frayed look.  Easy!

8.21.2012

Bedroom Storage Basket

I finally came across a basket large enough to hold pillows for our bedroom.  I had found several online, but after factoring in shipping, it was going to be too costly for me to justify it.  So, I continued to search and keep my eyes peeled for one.  We made a quick sweep through TJ Maxx last week when we were in Morehead City, and wouldn't ya know, there sat my basket on the top shelf in the housewares department.  And for a mighty fine price.  So, home it came with me.  My inspiration for this basket is pinned here.  If you see in the pin, I loved the idea of a stenciled basket.  I didn't want it to say "PEACE" though, I thought "REST" was more fitting for our bedroom.  So, I used my handy dandy wide-format/extra long length format printer, and printed off some big letters.  I used the font "Birch Std", font size 1000.  I'm pretty sure if you don't have a special format printer, you can just print it on two pages and then fit them together.  Then, just cut 'em out, tape them where you want them on  your basket and stencil.  I used a 1 1/4" spouncer brush from Walmart to dab the paint on.  Then peel your stencil off, and voila!  After I took the stencil off, I touched up the paint (with a regular, small paintbrush) in the nooks and crannies to make the letters a little darker and clearer.  I'm loving the finished look, and it is perfect in the bedroom!

My basket and blank canvas:


I used an acrylic paint by Folk Art in Vintage White (515).

Painted and drying!


I threw some extra pillows in there (I LOVE PILLOWS, if you haven't noticed!), as well as another throw blanket, too.  I think it completed the look perfectly!


It's a great piece that you see as soon as you walk in the bedroom door.  It kinda sets the mood for the room.  Take a deep breath...ahhhh....

8.15.2012

DIY Full Length Mirror & Floor Vase

I decided that after finishing the bedroom, it was still missing something. Specifically in the corner by the window. It was bare. But I didn't want anything too big because we already have a lot of big furniture in there. So, I decided to re-purpose a 5.00 Walmart mirror. You can find the original tutorial here. I started by pulling the cheap plastic molding off from the mirror. Please be very careful with this step. I broke my first one, and was extremely ill. Plus it sliced my finger. So, anyways, after that, we (I had Jason help me since I'm new to the whole electric saw thing) cut some 1x3 boards to frame it out, measuring the pieces long enough to fit around the mirror but leaving enough of a lip on the wood so that we could glue the mirror in place later. Then we stapled it in the corners on the back side to help the wood glue dry and help hold it extra super good. 
 
 
Jason took over stapling for a minute so I could get some pictures:


Then we hammered the staples in really good and flat, and let it all dry overnight!


I was so excited to get it done that I forgot to take any pictures of the staining process or gluing the mirror in, but it's pretty self explanatory.  We used Rust-oleum Wood Stain in Dark Walnut.  We let it dry for about 5 minutes and then wiped it down.


After it was done, we put it in said corner.  It still wasn't doing it for me.  So, I made another rope wrapped vase.  This one was a floor vase, and I used the chunkier Sisal Rope.  It used every bit of that role of rope except for one inch of it.  It worked out perfectly.  The vase was an 18 inch glass vase from Michael's in case you are wanting to duplicate!


Once it was wrapped up, I added it next to the mirror with the intent of adding some kind of vase filler.  STILL wasn't happy.  So, the last thing that I decided on was an old crate to set it all on top of.  Since I haven't been able to find one at the very limited amount of thrift stores around here, we made one with extra scrap wood.  We built the frame out of 2x2's in the dimensions we chose, which were 22 inches wide, 11 inches deep, and 13 inches high.  Then we just used wood glue and finishing nails to nail 1x3's all around the frame and across the bottom (which is kind of like the top since I turned it over to sit everything on top of).  We rubbed some of the same stain from above on random places, and once that dried, gave it a good coat of spray paint in Valspar's Churchill Vanilla.  Once it was all dry, I sanded the heck out of it and made it look as beat up as I could before the heat forced me inside again.  But I was so happy with the final product. 

So without further ado...the not so empty corner:


Our "rustic" crate that I am so in love with:


Added a few accessories.  Awesomely large grapevine ball was from Michael's, little box was in a gift set from Walmart.


The vase branches were 2.00 from a Salvation Army store, they were the same color as the mirror and blended too much, so I painted those too.  Same color as the crate.  The finished look was exactly what I was going for. I love when that happens! 

8.10.2012

This Week's Highlights

Jason is in between having classes on deck, so he has normal working hours again, and has weekends off!  Well, 'til the end of the month anyways.

We finished building the lean-to off the back of our shed last night!  Thank heavens.  It looks great, J did most of the work, I was just the assistant.  We just have to make some shelves and hang them, buy a few hooks for tools, and put some gravel inside for the mower, oh, and decorate it.  I'll post pictures soon!

My fall stuff is coming out.  Today.  I hope.  J has to dig it out from storage for me.  Because I'm afraid of spiders.  And lizards.

Our friends, Brad & Ashley came to visit last weekend.  It was a lot of fun.  We went and saw the Battleship in Wilmington.  First time for us, and we've lived here for almost 7 years.  It was toasty though, I think we will probably go see it again this fall or winter when it's cooler.

Kojak got a haircut!  Yay! 


J and Brad got the engine back in the Eclipse.  Another yay!  Can't wait 'til that car is up and running again.

I fashioned a blanket basket for the living room to collect all the stray blankets in one area.  The basket doubles as a photography prop sometimes, but it is also the perfect blanket holder.  I used some scrap wood to make a rustic sign with left over paint.  I roughed it up and made it look shabby.  I used letters from my Cricut to stick on after the first coat of black, then sprayed the off white over top.  Roughed it up with sandpaper and a paint scraper, and peeled off the letters.  Then I just attached it with some twine.


We occasionally check out the Big Lots here to see if there are any deals.  It's across town, and definitely not the nicest one I've even been to, but it's worth a quick peak once in a while.  They had citronella lanterns on clearance for the end of the season.  Real metal ones with glass globes.  And for only 4.00 a piece!  Score.  I took the citronella candles out, and will be replacing them with fall scented candles.  But first, we will take them apart and paint them black.  I have a really cute idea for them.  Can't wait to show you!


Our bi-weekly date night is coming up tomorrow (it will be more like a day this time).  I really look forward to these.  We've enjoyed finding creative ways to "date" without spending much or any money.  For just the cost of gas, and probably a cheap meal, we are going thrifting and window shopping in Atlantic Beach.  I'm lucky to have a fella who will do those things with me.  And actually enjoys it.  He's all about some DIY stuff.

J and I were able to take a walk the other night.  It was the coolest evening we've had in a long time, so we took advantage.  It was nice to breathe in some fresh (not so horribly humid) air, and enjoy the breeze coming from the rain showers that we had on and off all week.  We did some scouting for some nature themed decor.  Can we say free!  We found some small dead trees that had the perfect type of branches for floor vase fillers.  They will get a coat of paint soon.  And, I've started collecting some pine cones for the fall and Christmas decorations.  Now if we could just have that cool weather back.

OH!  I just found out this week that HOBBY LOBBY is coming to Wilmington.  Yeah, it's about 45 minutes away, but up until now, I didn't have a Hobby Lobby within driving distance.  The closest one is about 2 1/2 hours away.  You can't even imagine how happy this makes me!

Enjoy your weekend, I plan to:)

8.09.2012

Twine & Rope Wrapped Vases

Most of these vases I found around the house or in cabinets because I was bored with them.  Plain clear glass vases.  I ended up buying one, the one in the first picture from Walmart for about 5.00.  I purchased some twine and sisal rope from Lowe's, it's all one the rope/rope cutting aisle.  First, clean your vases and make sure you have plenty of glue gun sticks.  For my first run, I probably overused the glue.  I pretty much covered the vase as I went.  But the twine tended to slip a little easier than the rope.  So over-gluing is probably not a bad idea.  I started at the bottom of this one and all you do is just wind it, wind it, wind it.  Around and around, until you are at the top!


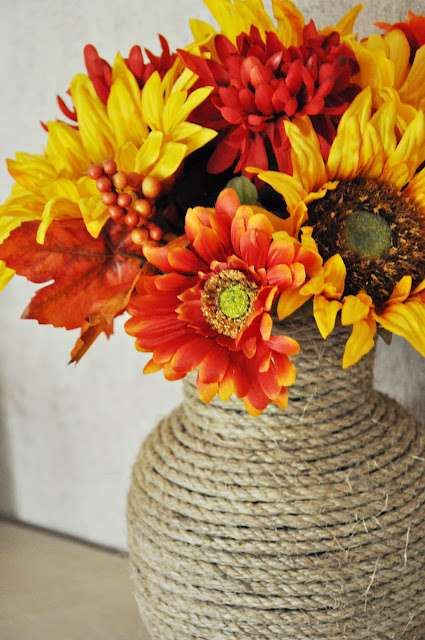
And then, you'll have this!  I love this look!  It's very simple, natural and earthy.  I haven't found the right flowers for this yet.  I think it will get a fall arrangement soon!


With the second one, I wanted a chunkier look.  So, I used the Sisal Rope, and a different shaped vase.  This one was on the top shelf of my kitchen cabinets, holding spare mini-grapevine balls.  Down it came, and the wrapping commenced.  I didn't have to use as much glue because the rope held it's shape better and didn't slip as easily.  I put a line of glue about every 1/4 to 1/2 way around each loop.


I started at the top of this one since the opening was pretty large.  I wanted it to have the look of it all being rope, so I wrapped the inside opening first, working my way up the inside, and then down the vase.  It totally achieved the look I was going for.  Oh how I love when that happens!


The finished look.  I think it turned out to be my favorite!  Keep reading, you'll see what I did with it at the end of this post!


Then, there was two taller, round vases that we used at our wedding for candles.  They got a good wrapping too.  Since I was running low on rope and twine by this point, I added some canvas with some stenciled numbers on them about 2/3 of the way up.  I was excited that this turned out how I pictured it in my head.  This doesn't always happen.  Believe me.


Just glue a strip of appropriately sized canvas around the vase, and cover with a row of two of the rope or twine to hide the seams. 


The chunkier rope needed a little something.  I didn't like the contrast of the thin material and the thick rope.  So this is what I came up with.  3 signifies the month we got married in, and there are three of us in our little family...including the dog, he would be seriously offended if he was left out ;o)


The second one wrapped with twine and canvas.  7 is my favoritest number, so of course it had to be included.


I did these over the course of two days.  It does take some time, but it really is an easy project.  Cheap too!  Especially if you already have a lot of extra glass vases hanging around.  Hey, glass anything really.  Wrap some mason jars, or glass bottles, it would all work!


And, here's how I'm using them right now.


This little one for pens on our coffee table was a little addition a few days later when I was frustrated with the abundance of pens laying around with no where to go.  I dug out a little jar that held pumpkin butter from Cracker Barrel last fall.  It got the same treatment and the number 5.  That is for the day we were married on.


Oh how I so love the way these fall flowers just fit with this vase.  Yeah, this is definitely my favorite so far!  It's the first of my fall decorations this year.  Many to follow soon!  I'm getting impatient.


Plus, I got these flowers really cheap at Michael's.  All of their fall bouquets were 40% off, and I only needed two.  I'm loving that the stores are starting to bring out their Autumn decor. 


Happy wrapping!

8.08.2012

DIY Mousepad

After months of using my mouse on the bare countertop and it collecting dust and whatever little particles it could pick up (therefore junking up the sensor eye), I decided it was time to make a mousepad.
You need:
A 9x8 piece of sturdy cardboard
A piece of thick fabric (I used canvas from a dropcloth) big enough to wrap around your cardboard
Glue gun
Stencil
Paint

Start by wrapping the fabric around the cardboard, like you're wrapping a present.  Gluing at the seams, and where the fabric will hit on the cardboard and need securing.

Then cut off most of the excess from the ends, fold sides in (as shown), and glue, then fold over onto back of mousepad and glue them flat.

I added another small strip down the middle due to the fact that the canvas was pretty thick and caused a bowing effect because of no extra bulk in the middle, you may not have to do that if your material is thinner.

After it was wrapped, I ran an iron over the top to smooth out any remaining wrinkles.

I just found a font I liked on Microsoft Word, printed out our monogram in a large enough font, cut it out and used it as a stencil.

Then dab your paint on.  This brush wasn't very dab worthy.  I definitely need a stencil brush.  But it worked well enough for the time being.

Then, for the outline, I just lined up two pieces of paper and stenciled in between them.  Like so...

The line came out a little uneven due to my non-dabbing brush, but I kinda like it a little uneven and wavy.

I think it works nicely in the office, and my mouse is much happier. And I'm happy that it was free:)